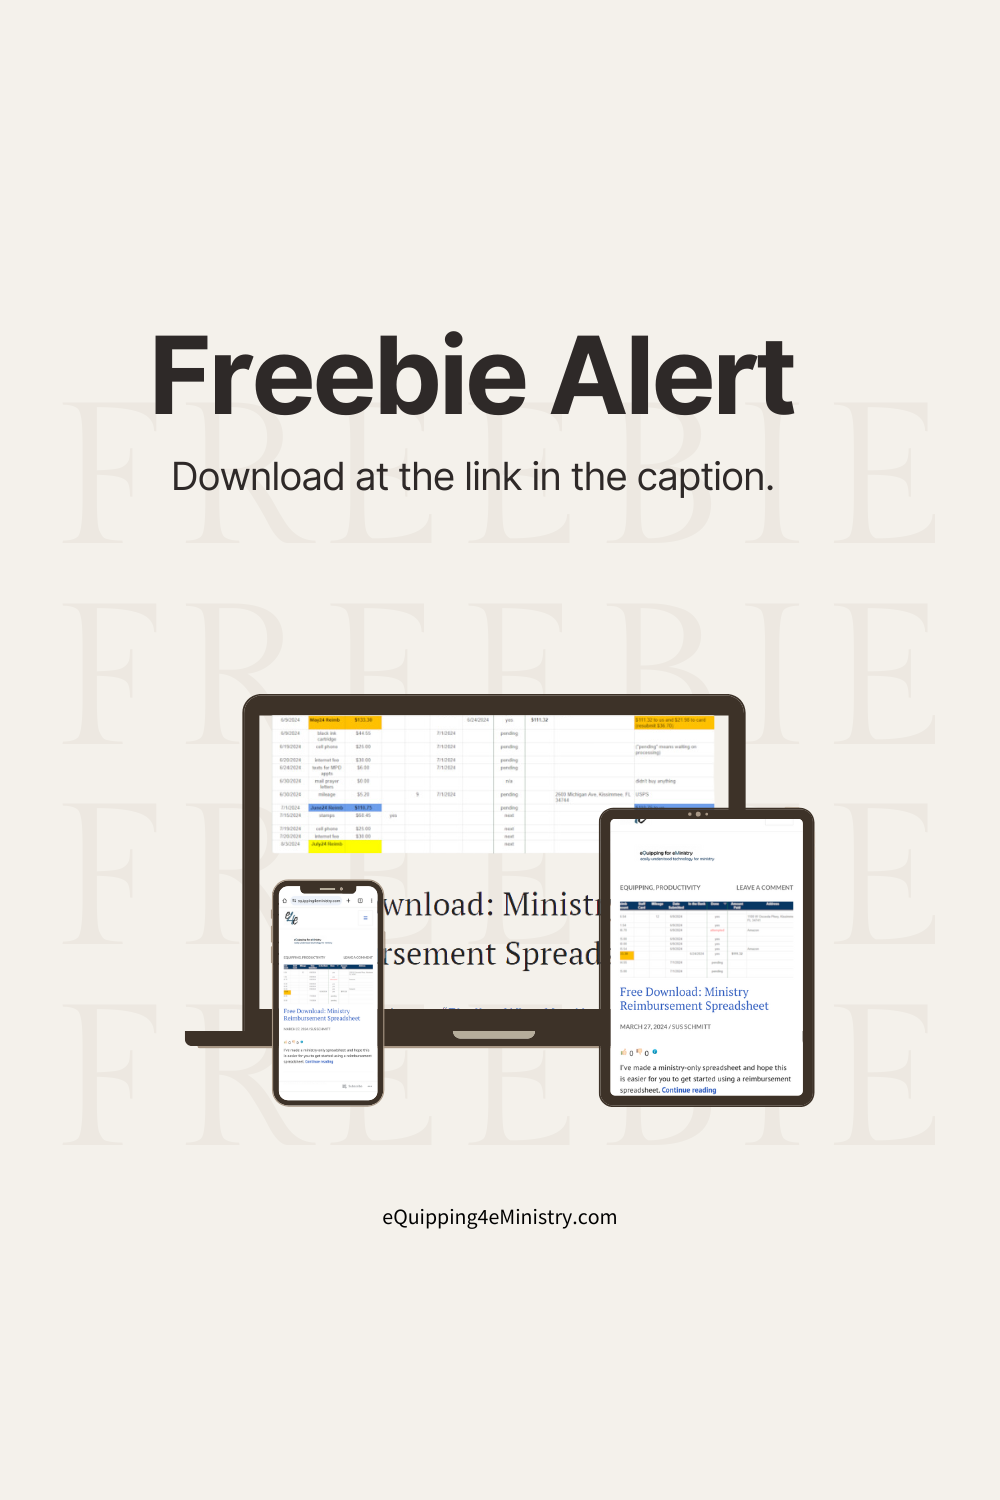
I’ve made a ministry-only spreadsheet and hope this post is easier for you to get started with a reimbursement spreadsheet. (My previous posts explained medical reimbursements at the same time.)
Why Would You Want to Use a Spreadsheet?
You may prefer to enter items to reimburse as they occur in Concur. That’s the simplest way to go, especially if you have few expenses. Concur allows you to edit before submission, too.
I do recommend a spreadsheet if you also need a place to:
- follow your pending expenses,
- make notes,
- keep a history of past reimbursements (also available in Concur).
Yesterday, I made mistakes on dates in Concur, but these were easy to spot. The entries were not in the same order in Concur as in the spreadsheet. It was easy to fix these before the final submission.
Free Download: Ministry Reimbursement Spreadsheet
On February 1st, I wrote “Finding What You Need for a Reimbursement.” You might need to look back to the beginning of that post, where you’ll learn:
- to keep up with your reimbursements,
- to use consistent folder and naming systems, and
- to keep track of recurring expenses in a separate tab or at the bottom of your spreadsheet.
And, hey, I’ve let these things slip, so I know the importance of a consistent workflow.
Steps for Your Ministry Reimbursement Spreadsheet
Getting Ready
Use this post to understand the template and to do your next reimbursement.
Okay! Let’s get started!
Download the 2024 Ministry Reimbursement Spreadsheet Template. Save a copy to your Google Drive. Keep it open as you read this post.
As a best practice, you’ll record expenses in your spreadsheet close to the day these occurred. Enter each item on a line, inserting rows when you need to. Do all screenshots, filing PDFs, etc., before you start submitting.
Tabs
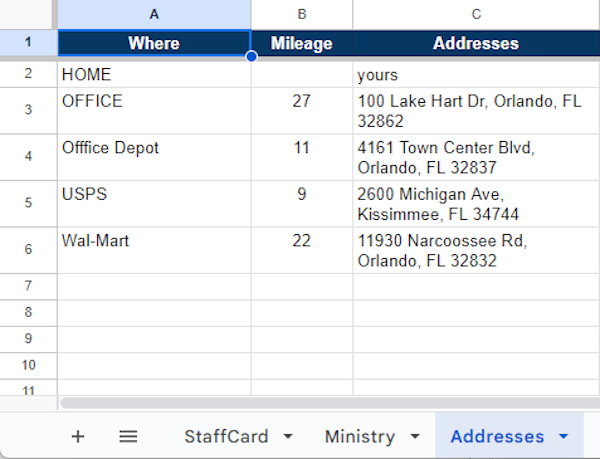
You’ll notice I have three tabs across the bottom. These are separate pages for StaffCard expenses, ministry expenses, and addresses.
I refer to the StaffCard in this post, but you might also use a Ministry Card. Make separate tabs for staff accounts and for ministry accounts. You’ll be submitting these expenses separately. Keep the expenditures on separate tabs.
The Addresses tab is convenient to store the places you visit often. Fill in the data for this tab as you make trips to these places. This helps so you don’t have to look addresses up each time you fill out a claim. Record them here once for reference later.
I name my spreadsheets by year, making a copy in January for next year’s reimbursements. The addresses are automatically in next year’s spreadsheet.
Columns
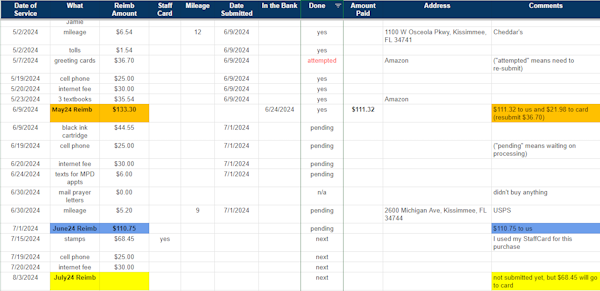
Keep all your entries in chronological order (Column A).
Fill out Columns A – D: Date of Service, What, Reimbursement Amount, and Card (if applicable) as these expenses occur. Enter “next” in Column H. Make comments in Column K when needed.
It’s different for reimbursing mileage.
- Fill out Columns A, B, and E.
- Enter “next” in Column H.
- In Column J, paste any addresses stored under the Address tab. Otherwise, enter a unique address for this line.
- You will know the reimbursement amount for Column C once you submit your information in Concur.
Examples of Entries
Here are a few examples in the spreadsheet template to help you understand how to use it:
- The recurring expenses are on the 19th and 20th of each month.
- The first yellow reimbursement (April) had only two expenses and would be easy to do. The flowers could have been included, but they are reimbursed the next month.
- For the orange May reimbursement:
- The total includes the April flowers purchase and all May purchases.
- I used my StaffCard to buy the flowers, so I made a note in Column D, Card. You could put “yes” or the last 4 digits of your card. Use the numbers if you want to use this column for tracking all credit card purchases.
- The blue June reimbursement is a $147.45 claim.
- The deposit in the bank is $110.75 (Column I) because $36.70 was rejected.
- I submitted the greeting cards, but something went wrong, so I will submit them again in July.
- I put “attempted” in Column H.
- I flagged “attempted” and the amount in red.
- Put the reason for the denial in Column K, Comments.
- The second yellow reimbursement (July) is $160.15. The amount deposited into our bank account was $91.70.
- The expenses are:
- The June greeting card purchase of $36.70.
- All July out-of-pocket expenses, which are $55.00.
- One StaffCard purchase of stamps for $68.45.
- The expenses are:
This example would be similar to Ministry Card expenses under that tab.
When You’re Ready to Submit
You’ll use the spreadsheet to enter your items into Concur.
In the spreadsheet, create a row for the report. Enter the submission date (Column A). Create a unique report name for your submission to Concur (Column B). After all items are entered in Concur, and receipts are uploaded, key in the total reimbursement amount (Column C) on the report line.
- You will use the report date for all line items in Column F, Date Submitted,
- My supervisor thanked me for including my name on my report. She has several people to approve.
- I also used Cru colors, so these stand out in my spreadsheet.
Log in to clear your card on the StaffWeb.
With your spreadsheet as a guide, enter expenses and upload receipts to Concur. Concur will be calculating a running total as you work through your claim.
In your spreadsheet, put the report date in Column F each time you submit a line item in Concur and change “next” to “pending” in Column H.
When you submit a mileage expense, Concur will calculate that amount. Enter it into Column C for that day.
Submit.
Concur will separate your out-of-pocket amounts and card charges (StaffCard or Ministry card). I put a note about this in Column K, Comments. When I see our bank deposit, I know what amount to expect.
When You Are Paid
- Change “pending” to “yes” in Column H.
- In the row for the reimbursement name and total:
- Put the date of the deposit in Column G, In the Bank.
- Put the amount you are paid in Column I, Amount Paid.
- Verify the deposit amount. (This is especially important if you used your StaffCard or Ministry card.)
- Post any comments if needed.
Column H – Done
Other possible flags for this column are research, denied, attempted, or not applicable (n/a).
Use the Filter or the Fixed Header
I’ve included a filter on Column H. Use the filter to look at only “next” or “pending” items as needed. When it’s near the end of a year, using the filter will hide all completed expenses.
The header is fixed, so you can also scroll to hide past reimbursements. (The filter is better for revealing odd exceptions.)
Either of these two options makes it easier to see:
- what still needs to be resolved or
- what’s new and ready to be reimbursed.
You’re All Set!
I thought of everything, but please contact me with any questions about this reimbursement template.
NOTES:
- Attention Cru staff: read “Get Some Help for Your Ministry Reimbursements” about new travel services and TripIt Pro.
- The spreadsheet is formatted in US dollars and for American calendars. (Here’s how to change the formatting for currencies and dates.)
- If you need to learn more about spreadsheets, I can help you on eQuipping for Ministry. Why not take some easy training from my good friend, Bob MacLeod? Start with Google Sheets Video Training.
Pin Me, Please