

I’ve been encouraging you to switch to a mobile-friendly theme for your blog if you haven’t already. Why? Well, at least half of blog readers are reading on a mobile device. You need to use a “responsive” blog theme which adapts to the size of the screen of whatever device your reader is using. Making this important change is even more essential because both Google and Bing now search for mobile-friendly sites (see NOTES for more detail).
By the way, if you already have a mobile-friendly site, but haven’t updated your blog’s look in three years or so, you should consider changing your theme anyway.
The rest of this post is specifically for WordPress users. Some of this content may apply to other blogging platforms.
Make the Switch to Mobile-Friendly
Are you ready to start? Set aside an hour and let’s get going. You won’t necessarily have to do all that is described below:
- Go to Appearance / Themes in the left sidebar of the dashboard.
- Put “responsive” in the search bar and enter. This will eliminate at least a third of the themes.
- If the theme has a dollar figure in a green oval in the lower right, you need to buy the theme. Actually, more than half of WordPress’ themes are free and offer a lot of options.
- View the Preview before you activate the new theme to see what your blog will look like “out of the box.”
- After you activate, you may be perfectly happy with the placement of all your widgets in the sidebar and footer or you may need to do some clean up.
Recommended Themes
Here’s a few of the free responsive themes for you to consider:
- Balloons (the balloons “float” when you scroll)
- Edin
- Fiore (feminine theme)
- Lovecraft
- Origin
- Penscratch
- Quadro (there’s also a circle version of this theme)
- Typo
- Yoko
Customize the Look
- I prefer a theme with one sidebar and a footer. You may choose something else, of course.
- Should the sidebar be on the left or on the right? It depends on your blog, actually. These two articles should help you decide.
- Should a Sidebar Go on the Left or Right? (ProBlog Design)
- Right vs. Left Sidebar (Webmaster-source)
- I prefer themes with a customizable header so I can personalize the look. Go to Appearance / Header and upload your image.
- Go to Appearance / Customize. Choose your fonts and other items to further customize your site.
- Go to Appearance / Widgets and drag the widgets you’ll use to where you want them (you can change your mind later). I recommend keeping all navigation widgets, like “Top Posts” and “Categories,” near the top in a left sidebar. If you didn’t have widgets on your blog before this, I recommend “Blog Stats” and “Follow Blog” at least.
- Also in Appearance / Widgets, drag “Archives” and just a few widgets into the footer. Your most important widgets need to be near the top of your blog.
- I do recommend putting some thought into your footer, though. These 50 Excellent Blog Footer Designs will give you some creative inspiration of what you could do.
- Remember to limit the number of widgets and put only the most important content in your widgets so your readers are not overwhelmed with choices. (I’m going to clean up my blogs’ widgets, too, on my next blog re-do.)
Check Your Settings
I’ll save more detail for another post, but check off your preferences in Settings at least from General through Sharing. Here’s a few “must-dos.”
- In Settings / General, type in a succinct tagline.
- In Settings / Sharing, connect your social media accounts so that your post publishes to social media automatically when you post from WordPress.
- In Settings / Reading, take care of Enhanced Feeds and Follower Settings.
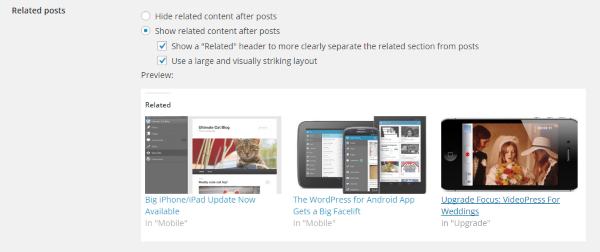
- Also, in Settings / Reading / Related Posts, check the second circle and its two squares (see the following screenshot). As you check and uncheck these, you’ll see how they look if you’d rather do this differently.
Add a Little Bit More
- In Appearance / Widgets notice the option for an After Post under the sidebars and footers in the right column. This gives you the opportunity to post something you wish to repeat after every blog entry. Look for my After Post between the post and the comments below. I use the After Post to encourage readers to subscribe to weekly eMails. I’ve also used the After Post for dated events, too, like giveaways and blog series.
- By the way, take a second to go to Settings / Discussions and at the very bottom of the page change the Comment Form to “What do you think?” or something more personable and inviting than the default, “Leave a reply.”
- For every post, include an eye-catching photo and add it to the “Featured Image.”
- Write an “excerpt.” (The excerpt window is under where you composed your post.) This short summary will appear on the home page rather than just the first 55 words (default). It’s also what appears in a Google search.
- Take the time to Optimize Your “About Page” on Your Blog. It’s the second most-visited page on your blog. Follow the link to learn what to do.
NOTES:
- Read Mobilegeddon and Its Impact on You about the new search criteria for Google and Bing.
- If you’d like more options, check out this article on 30 free themes.
- You may also find this wpbeginner.com article helpful: Checklist: 15 Things You MUST DO Before Changing WordPress Themes.
- This image is available on FreeImages.com.
