
Free Reimbursement Spreadsheet
LAST UPDATE: 05/06/2021
I just updated a template of my reimbursement spreadsheet that I’ve used for more than a decade to track reimbursable items throughout the year. It’s yours as a free download. I replaced the old version I offered before because this one reflects the new look of our EOBs… and is, hopefully, a little easier.
Maybe you already enter items into the Online Reimbursement area of the StaffWeb as your expenses occur. Good for you! That’s probably the simplest way to go. I do recommend my spreadsheet if you’ve found it hard to track details through the StaffWeb alone. Here’s some reasons…
If you start dealing with medical coverage and insurance… plus mileage and even tolls for those doctors’ appointments, you might need a little help tracking these things, especially with multiple family members. Additionally, if you use the StaffWeb page to record expenses as they occur, you can’t keep track of pending expenses there or make extensive notes.
I also know that some of you want to, or must, submit reimbursements by paper. This spreadsheet template is useful for electronic or paper submissions. Stick with me to the end for extra tips about paper reimbursements.
Spreadsheets 101
If you don’t do spreadsheets that much, give this one a try. It’s all set up for you and is especially useful if you’re Cru staff and have access to the StaffWeb. Other e4e blog readers are, of course, welcome to use this spreadsheet. The spreadsheet is automatically formatted for US dollars and for American calendars. (Here’s how to change formatting for currencies and dates.)
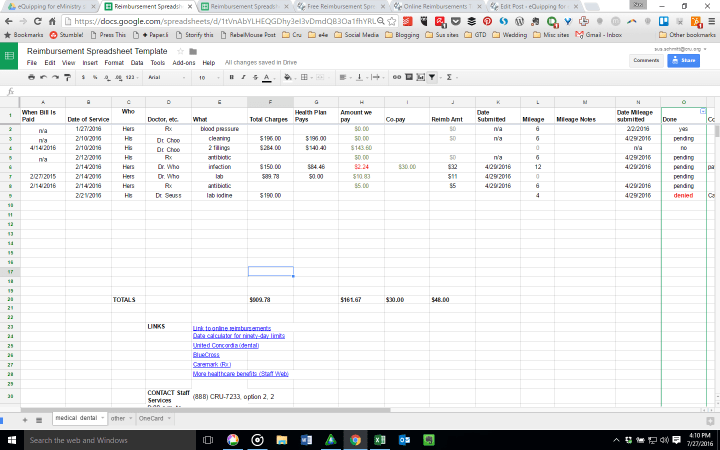
You’ll notice I have three tabs across the bottom. These are separate pages for medical / dental, for ministry, and for OneCard expenses. You could duplicate the medical / dental spreadsheet and keep your dental expenses separately from your medical, if you prefer. I’ve done this, especially when our children had extra dental work. Optionally, create a separate medical / dental sheet for each family member.
How to Use It: Record Your Expenses
Let’s get started with your spreadsheet (click for download). You should be able to share it to your Google Drive to make it your own.
When you have a reimbursable expense, fill in the values for the date, cost, and what it was in your spreadsheet under the appropriate columns and on the correct sheet. I enter this data in chronological order. Put your receipt in a folder (or send a scanned image for clearing your OneCard).
I used to have a separate mileage tab. I’ve decided the best way to make sure none of these costs slip through the cracks is to just include mileage, tolls, and parking with the related expense. So, mileage information is in the last columns of both medical and ministry sheets. Use Google Maps or your favorite tool to determine distances.
After receiving an Explanation of Benefits (EOB), fill in the values under each of the columns (total charges, health plan pays, etc.) under the medical / dental tab and put the EOB in your reimbursement folder. If I haven’t received (or paid) a bill from a lab or doctor yet, I put a red dollar value in the “Amount we pay” column. If insurance covered everything, I put a green $0.00 in this column. If we paid our bill, I put what we paid in green in that same column.
Your medical and dental deductibles total in the lower portion of columns K – M on the medical / dental page. Change your deductible limits to match your healthcare plan. If you need a different number of deductible columns, delete or add columns.
Hide columns you don’t need at the time you’re working. (Highlight the columns and right-click to choose “hide.”) For instance, I usually hide the Deductibles columns. If you don’t want the deductible columns, just delete them from your copy of this template.
Highlight one or more rows at the bottom when you need more lines for expenses. Right-click to insert row(s); all the dates- and dollars-formatting will be in place for your new row.
How to Use It: Submit Your Reimbursement
You’ve recorded expenses and now you’re ready to submit a reimbursement. If you haven’t used the StaffWeb for an online reimbursement. Read my post with instructions on how to use this helpful online tool.
Here’s some suggested steps how to work your way through the tabs in this spreadsheet, using it to guide you in submitting your reimbursement on paper or online:
- For a ministry reimbursement, do the “ministry” tab first.
- Put that day’s date under the “Date Submitted” column and type “pending” in the “Done” column. (Do this step for each row of data transferred from your spreadsheet to a reimbursement form.)
- Work through all your mileages in chronological order. I have a separate “Date Mileage submitted” because that does happen. It’s less confusing to submit all the related expenses on the same reimbursement, however.
- If you want to, after you enter all your ministry mileage in the mileage log, enter the total value calculated on the StaffWeb for your “mileage $ amount.” I put this value in the “Toll / Park” column in a new row, adding the date submitted and “pending” in the appropriate columns.
- If you have tolls and parking fees, add them to the ministry reimbursement next.
- Now, do your Healthcare reimbursement.
- Go to the “medical / dental” tab (or tabs, if you’re doing separate sheets per family member).
- Do the same as step 2 for each medical expense transferred from your spreadsheet to a reimbursement form.
- Do the same as steps 3 through 5 for your healthcare mileage.
Miscellaneous
Red values in the spreadsheet catch my eye next time I sit down to work on a reimbursement. Do I need to call the doctor’s office or find a lost receipt? Any rows with red values have “no” in the “Done” column even if I submitted a reimbursement before paying a medical bill, for instance.
After several months of working, use the filter on the “Done” column to hide the expenses that are completed. I use “yes” in this column when the expense and mileage are reimbursed and the bill paid. Then, when it’s later in the year, using the filter will hide all completed expenses and it will be easier to see what hasn’t been resolved yet or what’s new and ready to reimburse.
I do one spreadsheet for the whole year, named “2016 Reimbursements,” for example. Alternately, do a separate spreadsheet per reimbursement if that’s your preference. Name these “201603 Reimbursement”, etc. Using a YYYYMM format makes your reimbursements instantly sortable and easy to find. Keep them all in a MPD spreadsheets or financial spreadsheets master folder on your computer (or in your cloud storage so a spouse can also add expenses and do submissions).
Some Words about Online Reimbursements
I prefer to record online reimbursements when I’m ready to submit so the online date is closer to my submission date, otherwise the date in “View Reimbursements” is when you started entering data. not when the reimbursement cleared. This can be confusing if you’re going back to your online record to figure out old reimbursements. Also, if you record data in the Online Reimbursements tool, you can’t “do another reimbursement” online until that existing one is taken care of. This might be an issue for you.
Some Words about Paper Reimbursements
If you prefer paper reimbursements or you have to delay submitting reimbursements, I think the spreadsheet can be especially helpful for you. As you hold on to a stack of paper reimbursements, you could put more values in the “Done” column like “signed” or ” filed” or “submitted.”
Again, you would consider whether to have separate spreadsheets per year or per reimbursement. I think I would keep a year’s spreadsheet. It’s fairly easy to hide all the rows (and some columns, too) not pertinent to a particular reimbursement. First, sort on “Date Submitted” and then on “Date of Service.” Then, hide the rows outside of the “Date Submitted” that you’re interested in and print a copy of your spreadsheet(with just this data) to clip to the paper reimbursement until you’re ready to turn it in. In this way, a year’s reimbursements is in one document. If that really doesn’t matter and a separate spreadsheet per each reimbursement works better for you, then that’s the way to go.
Get Your Free Spreadsheet
Again, here’s my spreadsheet in Google Drive. I have “dummy data” in it so you can see how to fill it out.
If you have trouble accessing the spreadsheet, reach me at e4e at cru dot org. I’ll email you Google Sheets invitation or an Excel sheet.
If you have other difficulties or special needs, let me know. If I can help, I’ll certainly try!
And now you know why I call myself “Susie Spreadsheet!”
NOTES:
- Most of the embedded links in this document only work for staff with access to the StaffWeb. I have links for:
- submitting online reimbursements
- the rate chart
- a currency converter
- a date calculator to keep an eye on ninety-day limits.
- clearing your OneCard
- sending an email to OneCard or Staff Services
- Here’s toll calculators for central Florida:
