
I know some of you simply use MailChimp to send a prayer letter in the body of your email, but if you post in a blog, write that prayer letter as a post so that when you hit “publish” your prayer letter automatically could go to Facebook and Twitter as well as to MailChimp for a scheduled email. Write once. Publish in multiple locations. Remember, your readers probably don’t go to your site to read unless they click a link you provide in social media or in an email.
Let’s keep it simple and just look at MailChimp today. Your blog host has settings for your blog post to automatically publish for you on Facebook and Twitter (WordPress will also post to Tumblr, Google+, and LinkedIn). I won’t cover these in this post.
If you put all your prayer letters in a prayer letter section of your blog / website, I’d like to suggest you simply publish them as blog posts instead, so that when you publish a post on your blog, you would automatically email your posts through MailChimp (daily, weekly, or monthly… you decide). The post can be your prayer letter or any other content, of course.
What is RSS?
First of all, it might be helpful to review.
RSS, Really Simple Syndication, is a news feed. MailChimp checks your feed when it’s time for your next scheduled email from your blog. If you haven’t written anything, nothing will send. So, here’s how to set up MailChimp…
Sending MailChimp Emails from Your Blog
RSS-Driven campaigns in MailChimp are automatically sent when your RSS feed is updated with a new post. You specify how often and when these emails will be sent. You’ll pull content from your blog through MailChimp’s RSS merge tags (code that grabs specific information from your blog to use in your email campaigns). These tags tell MailChimp what to look for from your blog’s RSS feed.
Go to MailChimp’s instructions for setting up an RSS-Driven campaign (right-click on this link to open these instructions in a separate tab on your browser) and then come back to this article for specific merge tag suggestions.
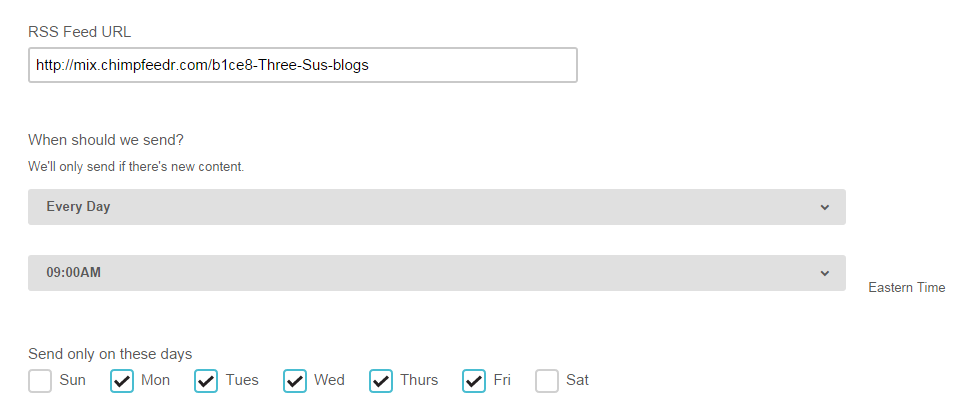
If you only write occasionally on your blog, here’s a screenshot of recommended settings for your RSS Feed step. Your RSS feed URL is probably http://yourblogname.com/feed. I used ChimpFeedr so my URL in the example is slightly different (see NOTES):
The Merge Tags
After the RSS Feed and Recipients step, you’ll put in a subject line in the Setup step. I recommend using the title of your blog post for your subject line. Paste this merge tag into the subject line so the title of your post is the subject of your email:
*|RSSITEM:TITLE|*
I recommend you send the entire body of your post for your email’s content. Choose a single column template for your email. Use an RSS template if you’d like to.
Go to the Design step. Paste this merge tag in the body of your MailChimp email. I used Heading 2 for the style and centered it.
*|RSSITEM:TITLE|*
Next, I used the merge tag for the full content of the blog post (including photos, by the way). I left-justified this tag.
*|RSSITEM:CONTENT_FULL|*
Here’s a sample email from one of my blogs so you can see how this looks. The photo was a little big, but MailChimp still handled it. RSSITEM:TITLE is A Day in the Cotswolds and the RSSITEM:CONTENT_FULL follows immediately after.
Confirm and schedule your campaign. Now, when you post in your blog, that’s all you need to do. Your readers will receive a MailChimp email on your scheduled day.
In Summary
You know that I recommend not sending an email to your financial partners that says “ministry update” in the subject line and has an attached PDF letter. If you use the above steps, every email campaign will have a unique and compelling subject line with an attractive “letter” ready to read in the body of your email. Your letters will more likely be read if you’ll take this short bit of time to set up your RSS-Driven campaign.
Forward your first RSS-Driven campaign to me (e4e at cru.org). I’d love to see it!
<< First post for the You-Can-Too series
<< First Next (in communication posts) >
<< First (in website posts)

Visit the Table of Contents for the You-Can-Too series posts. This post is in both the communication and website portions of the series. Keep following the series for posts on databases, communication, websites, and social media.
NOTES:
- MailChimp also allows you to post (or share) your “email campaigns” to Facebook and Twitter (and many other social sites). Especially if you don’t have a blog, you could consider this option. Learn more from their knowledge base.
- RSS merge tags for MailChimp campaigns.
- If you have more than one blog, use ChimpFeedr to make one feed for your campaigns. This way, you would have one email campaign for multiple blogs.
- Freddie is MailChimp’s mascot. (Legal terms for using Freddie.)

2 thoughts on “Sending MailChimp Emails from Your Blog”